Over the past month Zoom has released a raft of new features for the desktop app that can improve how you look and sound in your meetings, as both a host and a delegate. Read on to learn how these improvements can help you Zoom like a pro.
Slides as virtual background
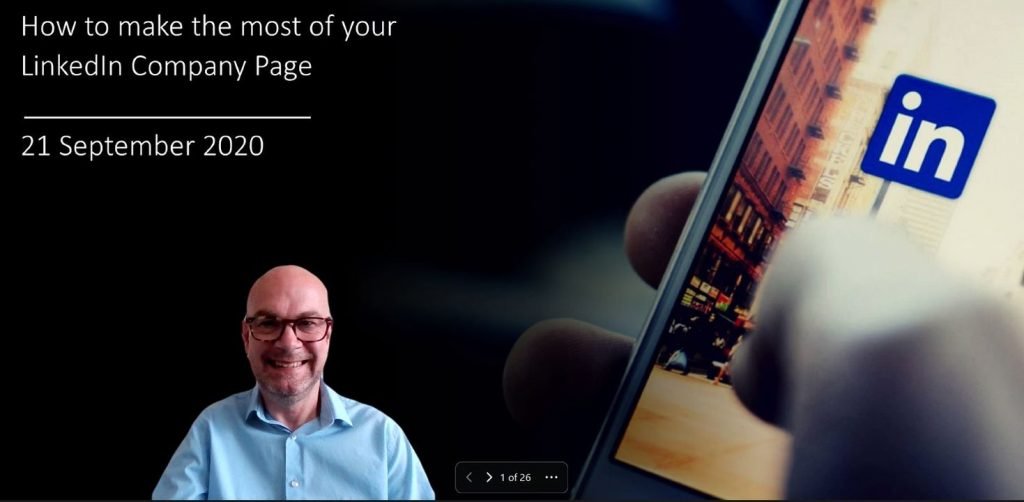
This new feature is a game changer for presenters and trainers. Your video window is superimposed over your slides. You choose to have your PowerPoint or Keynote slides as your background and resize and move your video window to the best position. The video window is transparent so you’ll look great over the slides.
Previously in Zoom meetings, the delegate controlled the view on the screen but this feature is game changing because firstly; it’s the host who controls what the delegate sees and secondly; it provides a much better experience for the both delegates and presenters. Delegates want to see plenty of the presenter or trainer on the screen and the increased video size means more use of body language, eg arm gestures, to get re-inforce points being made.
Pro-tip: Ensure that you leave some space on your slides where you can position your video window.

Video filters
You can have some fun with filters in the same way that you can over on Instagram, Snapchat and TikTok. Surprise your delegates by wearing a face mask and asking why they aren’t wearing theirs!
If you’re having issues with getting virtual backgrounds to work you can use filters like Picture Frame, Analog television and scrapbook although these are more suitable for friends and family than business meetings.
Pro-tip: Try the Boost and Seafoam filters for improved contrast.
Lighting adjustment
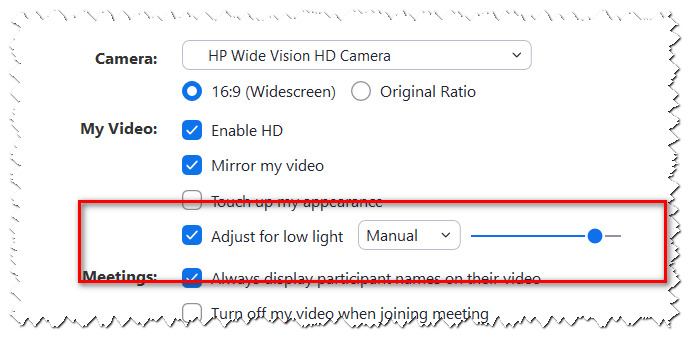
Lighting is the most important aspect of looking good in your Zoom meetings so it’s vital to get rights. This new feature available under Settings/Video is great if you have low lighting in your environment. Ideally, you should have a lamp or a window in front of you, but the “Adjust for low light setting” can really improve your lighting and therefore your appearance for delegates, without looking artificial.
Pro-tip: Set the slider (see below) to Manual to give your lighting an extra boost but don’t overdo it so that you look washed out.

Emoji reactions and feedback icons
Using the wave reaction or thumbs up are great ways to react to the presenter and other delegates and now you can use emojis too. Click the Reactions button on the Zoom menu control bar to check them out. Heart, Laughing/Crying Face, Open Mouth and Tada (Party) are available. You can also indicate to the presenter that you want them to speed up or slow down by using feedback icons. Expect more reactions and icons to be added in due course.

Pro-tip: As a presenter encourage delegates to use the Reactions to interact with your talk or training.
Background noise suppression
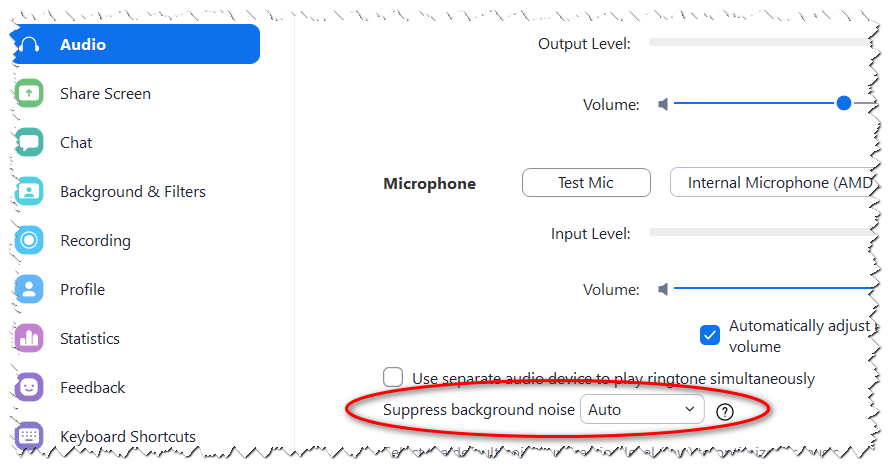
Ideally you want to use Zoom in a quiet environment but if you can’t avoid traffic, air conditioning or other background noise the “Suppress background noise” feature under Settings/Audio will help.
Plus if you have a clacky keyboard or loud computer fan this new Zoom feature will help reduce their noise.

Pro-tip: Set “Suppress background noise” to Auto unless you are playing music, in which case select to Auto.
High fidelity audio mode and Disable echo cancellation
This one is great for musicians and DJs. If you are broadcasting live or recorded music over Zoom then the High fidelity audio mode can improve the sound quality but it’s not easy to find. To activate it Go to Settings/Audio then click the Advanced button on the bottom right. The check “Show in-meeting option to ‘Enable Original Sound’ from microphone” and the “Disable echo cancellation” and ” High fidelity audio mode” options will appear. You can then check the latter. If you are using high quality equipment to broadcast you can check both options.
Pro-tip: If you’re a musician who does live online broadcasts, Zoom can provide a better quality show than Facebook and Instagram Live.
Custom gallery view organisation
As the host you can now drag and drop video windows into any order you wish then fix their configuration. The feature locks the gallery view into a fixed position which won’t change when someone speaks or leaves the meeting. So for example, if you’re attending a virtual business networking event you can keep the layout static so that people don’t get juggled around as others leave.
Pro-tip: If you’re a lecturer or teacher you can replicate your classroom layout in the virtual environment.
Multi-pin for video windows
Pinning a video window allows you as a delegate to disable active speaker view and only view a specific speaker. With this new multi-pinning feature you can now pin more than one person’s video window at the same time. Pinning another user’s video only affects your own local view, not the view of other participants and will not affect cloud recordings.
Pro-tip: Customise your layout of delegates exactly how you want to. For example, if you want to focus on 2 people in the meeting, you can.
Multi-spotlight for video windows
This new feature differs from pinning in that the host rather than the delegate controls it. A meeting host can spotlight a video window which makes the delegate the active speaker for all participants in the meeting and cloud recordings. With multi-spotlight, you can now spotlight more than one participant. To spotlight or multi-spotlight, there needs to be at least 3 participants in the meeting with their video switched on
Pro-tip: This feature is ideal for a panel of speakers presenting to the other participants.
Ask to unmute
Zoom now allows hosts to unmute participants if they’ve given their pre-approved consent. Zoom previously allowed the host to Unmute all but this feature was removed in May 2020 due to privacy concerns.
However, Zoom has addressed these concerns by adding pre-approved consent. A host can schedule meetings and webinars with “Request permission to Unmute Participants”. This allows participants to pre-approve the host’s ability to unmute them when a meeting starts.
This pre-approval stays in place for all meetings and can be revoked by the participant at any time.
To enable the pre-approval feature, go to zoom.us then Setting/In Meetings (Advanced) then enable the “Request permission to unmute” slider.
To Unmute delegates in a meeting, open the Participants window then select the 3 dots menu then check “Ask all to unmute”.
Pro-tip: Hosts can obtain pre-approval and unmute in cases where delegates aren’t familiar with Zoom’s controls or who regularly forget to unmute when speaking ?
For more on making the most of Zoom, book one of my regular Zoom Like A Pro courses that I run for NILC or watch short Zoom training videos.

